Space Mission 30
Space Mission 30 is a mechanical gaming keypad built for maximum comfort and flawless wins.
Keypad hardware
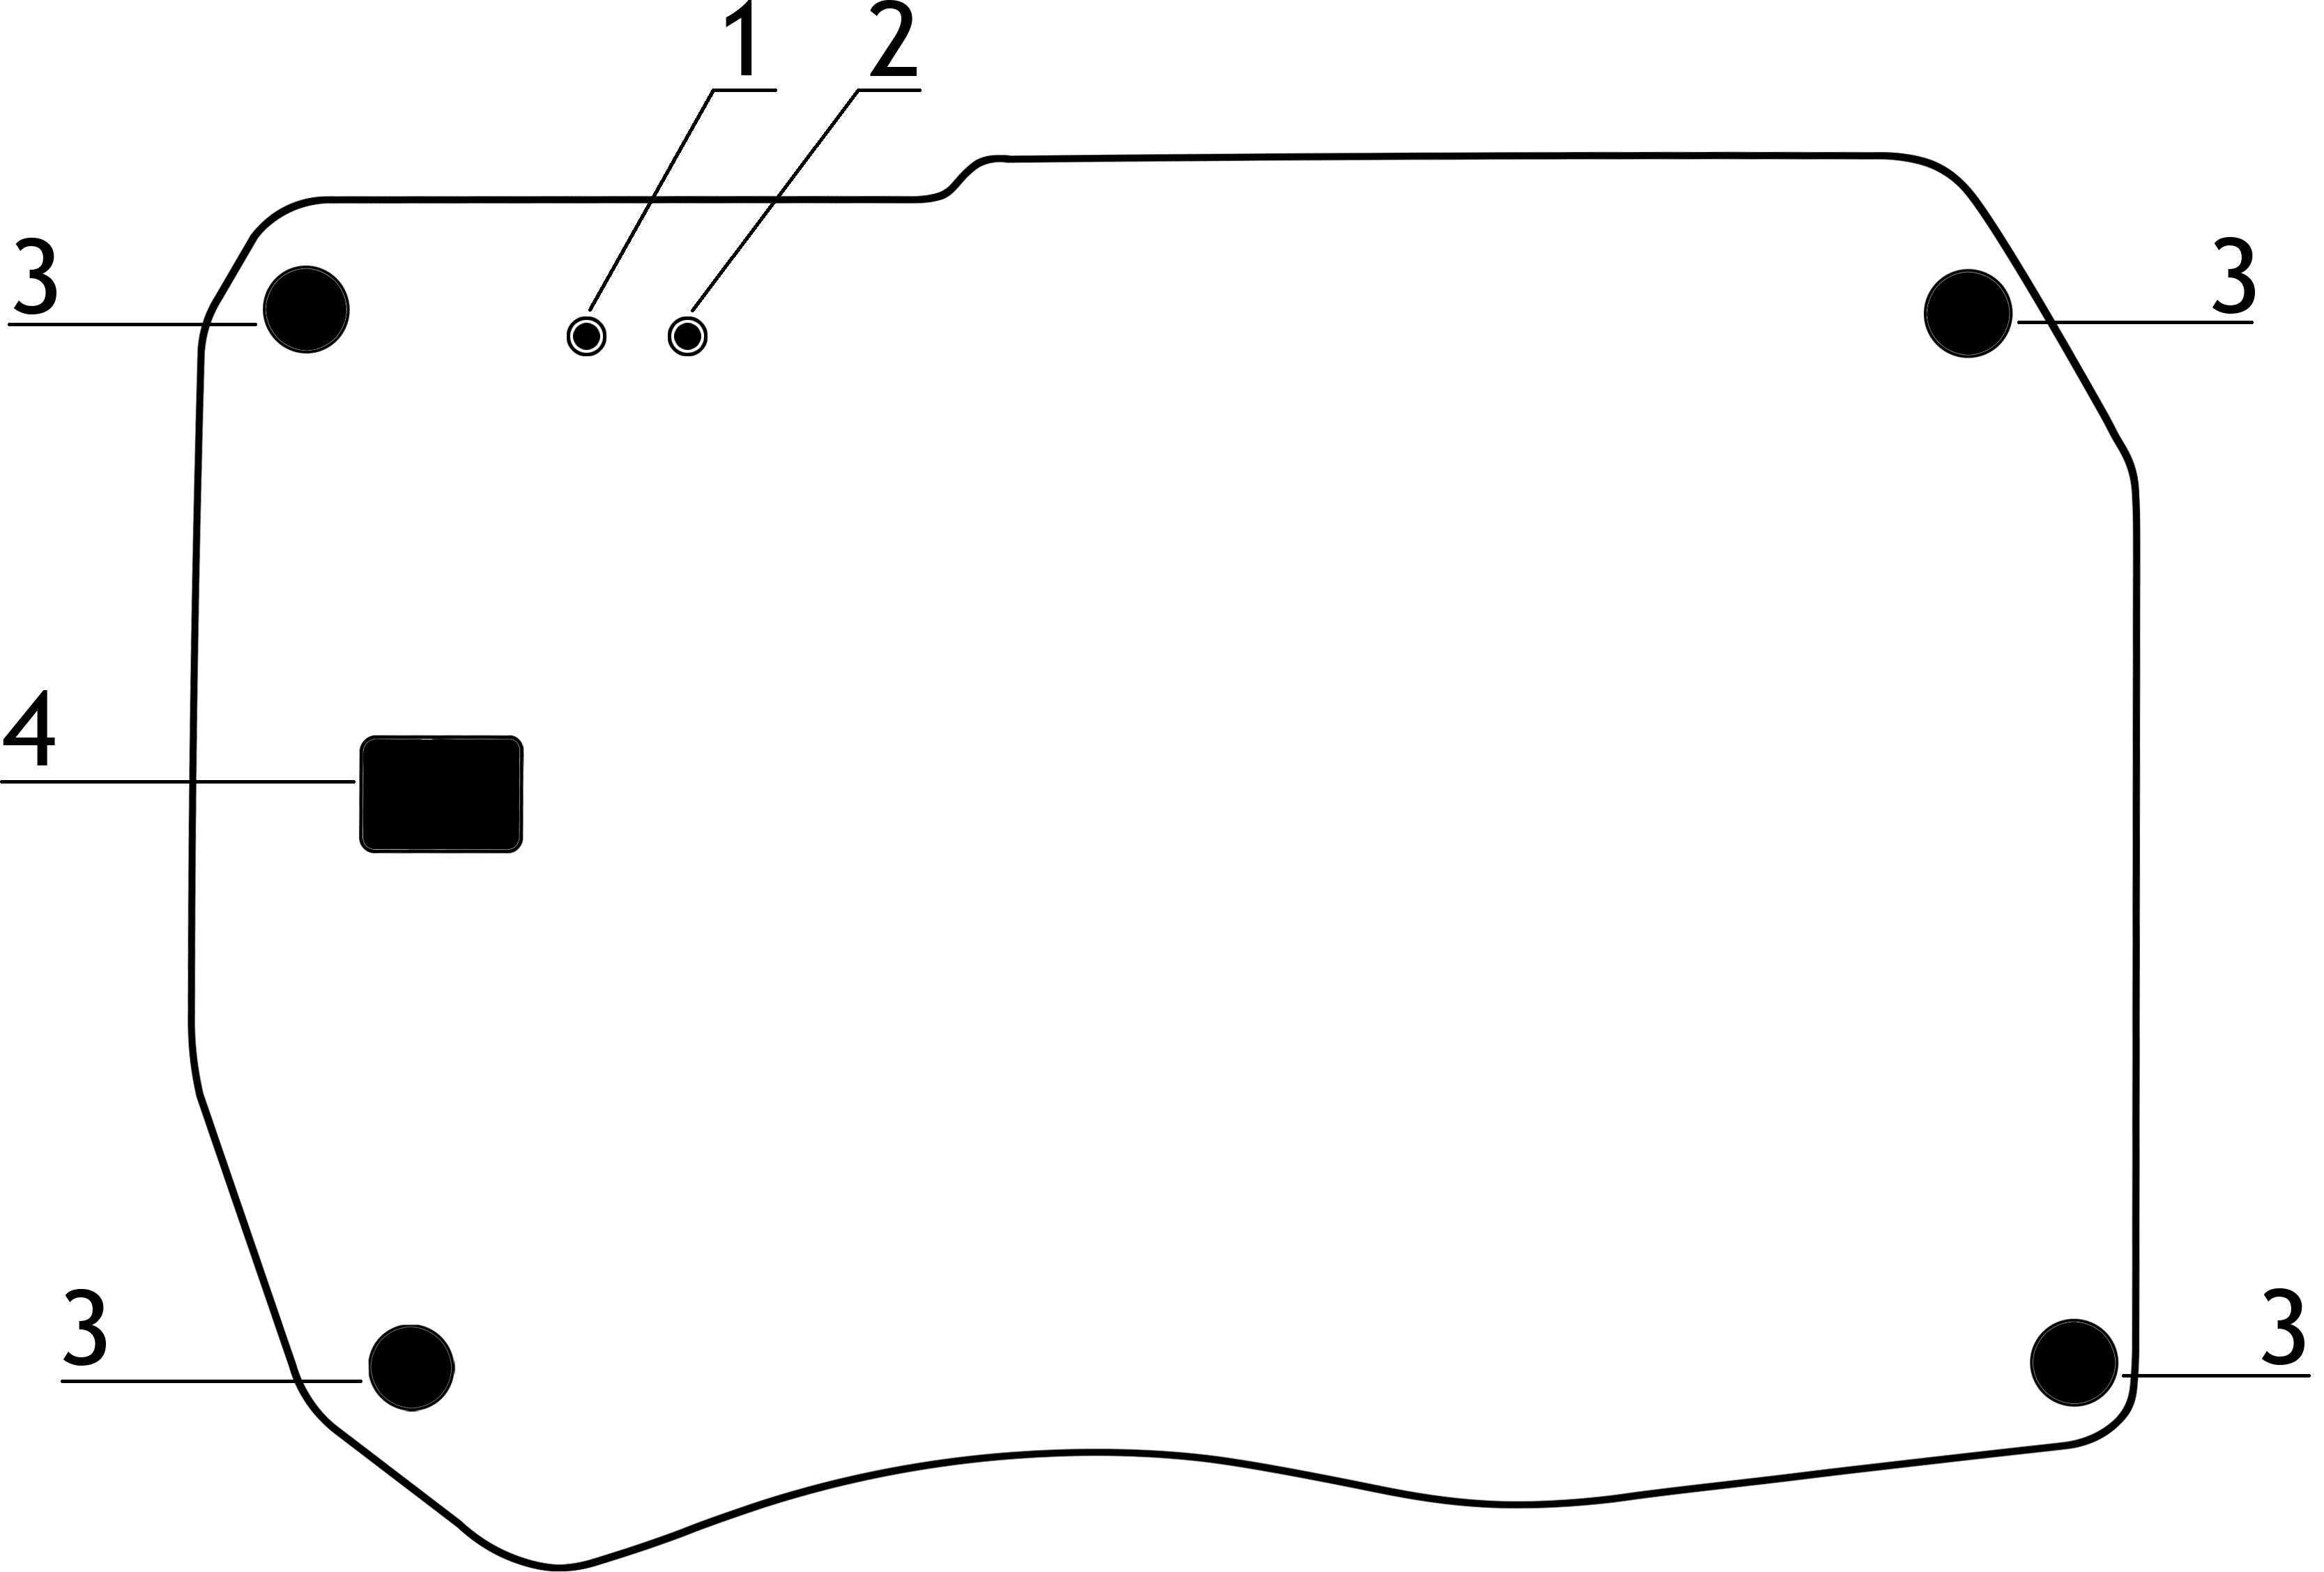
- BOOT button
- RESET button
- Silicone feet
- Service cutout/window for disassembling the keypad case
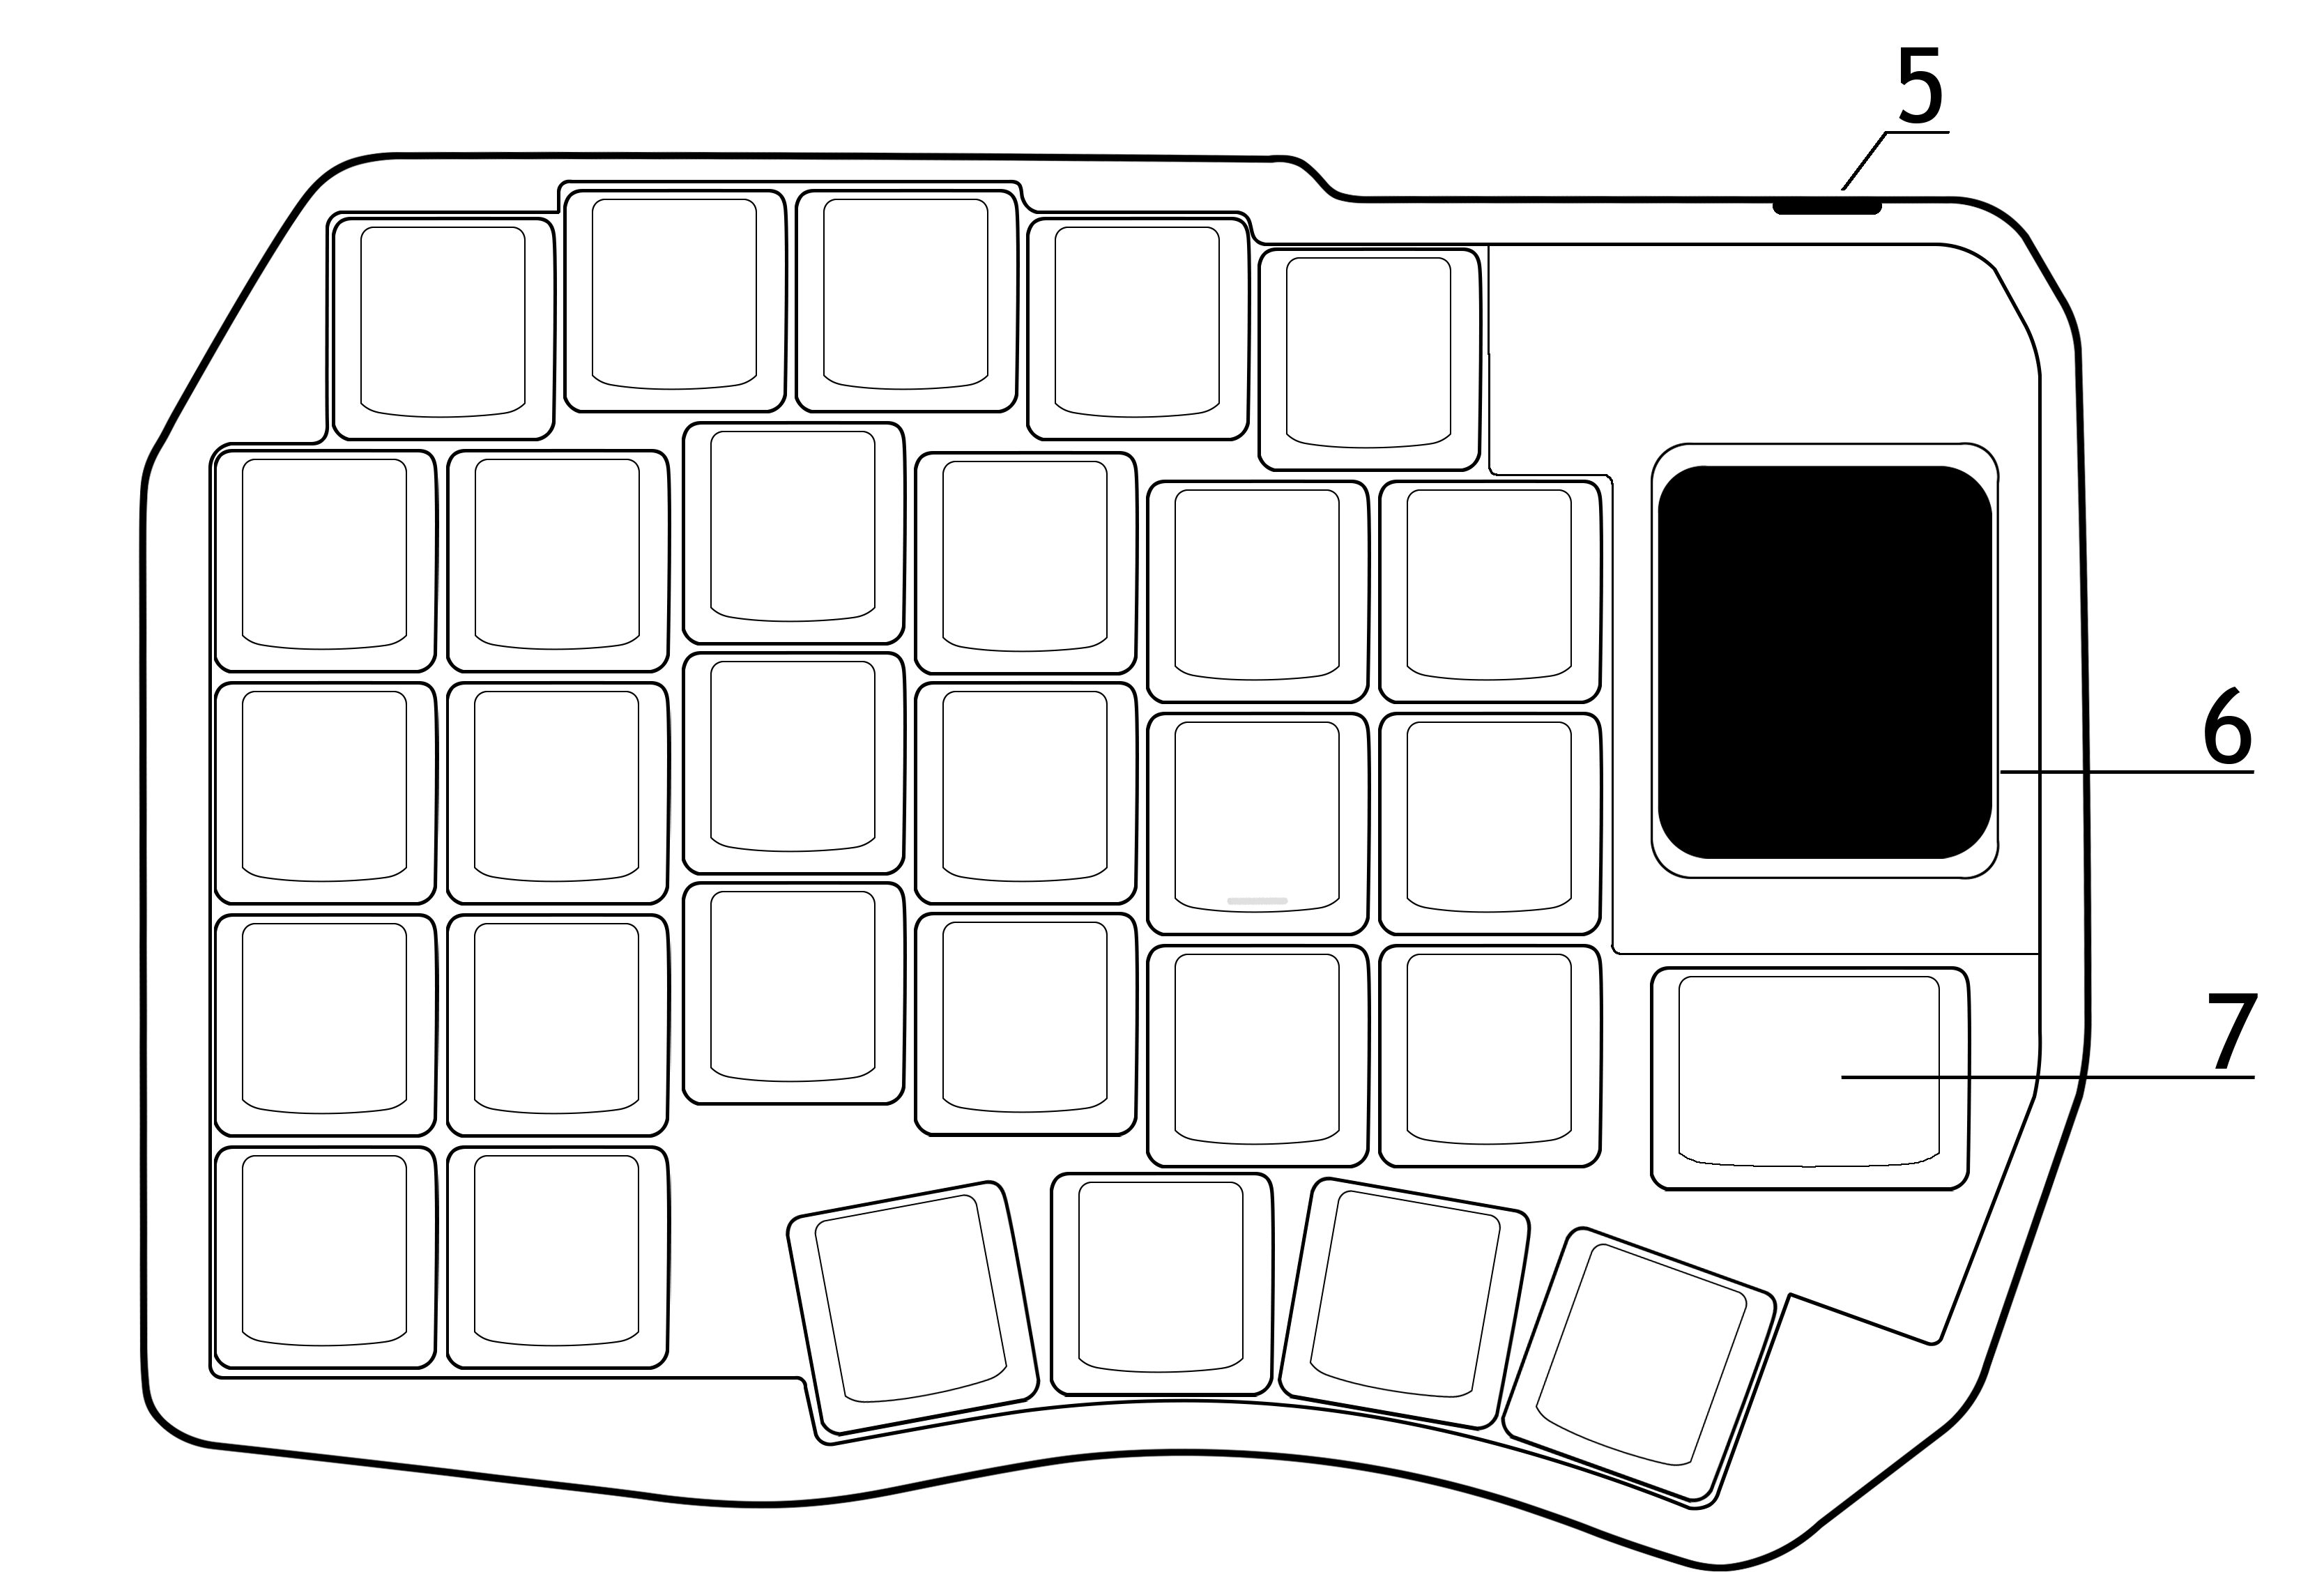
- USB‑C port
- Display
- Slot for installing an MX switch or a hot-swap encoder
Connection
- The Space Mission 30 keypad works with devices running Windows, macOS, Linux, Android, and iOS.
- The keypad connects via Plug and Play (PnP); no additional driver installation is required.
- When connecting to a device, make sure the USB‑C cable is firmly inserted into the keypad’s port.
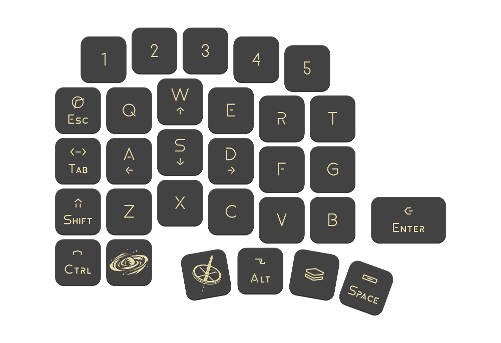
Keypad setup
Layer setup (layouts) in Vial
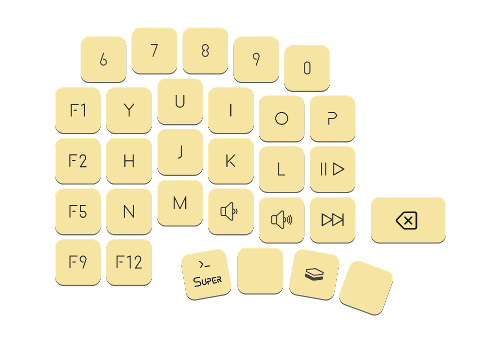
Layers let you change the keypad’s functionality depending on which layer is currently active.
Assigning keys to switch layers
- Install and open Vial or use the web version, then connect the keypad.
You can view each available layer by clicking its number at the top of the interface. Layer 0 is your base/default layer.
- Choose the layer from which you will activate your new layer.
By default you have the base Layer 0 and an additional Layer 1 (activated by holding the MO(1) key). In this example we’ll configure switching from the base Layer 0.
- Pick the key that will activate your layer, then in the bottom menu open the Layers tab.
There are multiple ways to switch layers. Open the Layers tab in the bottom menu to see the available options.
- Select the activation method and the layer number to use.
In this example we’ll use TG(*), which toggles a layer on if it’s off, and off if it’s on. You can learn about other layer switching methods in our article. By default we already have 2 layers, so in this example we’ll configure Layer 3 for a new layout; therefore we’ll choose TG(3), where the number in parentheses is the layer being toggled.
- Select the layer you want to edit and assign keys/macros to the buttons you need.
Since we’re creating our own Layer 3, select Layer 3 at the top of the interface. First, assign a key to deactivate our layer and return to the base Layer 0: select the same button in the layout and click TG(3) again in the Layers tab.
As an example, we’ll assign arrow keys to the W, A, S, D positions. On Layer 3, select each key position in the layout and click the corresponding keys in the Basic tab.
P.S. The triangle symbol means “transparent.” That means pressing a key with a triangle will perform the same action as the layer below it. In our example, below Layer 3 is the additional Layer 2, so the triangle keys will trigger the actions defined on Layer 2.
Layer use examples:
- A separate layer for layouts that fit different game genres
- A separate layer for macros that help you quickly send messages in in-game chats or use combos
Creating macros in Vial
Macros let you send multiple key presses by pressing a single key. They can do anything you want: type whole sentences, or repeat routine in-game actions.
Macro configuration for creating combos
Let’s create a macro that presses A, D, S, S, J in sequence.
- Open Vial or use the web version, then in the top menu go to the Macros tab.
In this tab you can view each available macro by clicking its number at the top of the interface. Up to 109 macros can be created.
- Choose a macro number, then click Add action in the bottom-right corner.
In this example we’ll create macro M0 using the most common method: Add action, which manually adds an action to the list.
You can also use Tap Enter (adds an Enter key press quickly) or Record macro (records a macro directly from the keyboard).
- Select the needed action from the dropdown and assign keys for that action.
Choose the Tap action (sends a single key press, or a chord), click +, and assign the A key.
Other available actions include Text (type a text snippet), Down (press-and-hold), Up (release), and Delay(ms) (a delay between actions).
- Add the next action to the macro, the same way as in the previous step.
Click Add action again, choose Tap, click +, and assign the key — this time choose D.
Actions are executed from top to bottom. Keep this in mind when building macros. If you need to reorder actions, use the up/down arrow buttons on the left side of the action you want to move.
- Add the remaining actions and save the result.
Just like in step 3, add key presses S, S, J to the macro.
When you finish creating the macro, click Save in the bottom-right corner.
Macros are saved to the keyboard’s internal memory and will also work on another PC. When saving a macro, Vial may ask you to unlock the keyboard by holding two keys in the top-left corner.
- Assign the created macro key to the layout.
In this example, assign macro M0 to a key on Layer 3: go to the Keymap tab in the top menu, select Layer 3, select the desired key on the layout, then in the bottom Macros tab click M0.
Choose any layer and key position that’s convenient for triggering the macro; see the layer section above for how to create layers.
Macro configuration for typing text
As an example, we’ll create a macro that opens the global chat in Counter-Strike 1.6, types "Hello!", and sends the message.
To follow this example, you need to understand the steps required to send a message to global chat in CS 1.6. By default, you open the global chat window with Y, type the message text, and press Enter to send it.
- Open Vial or use the web version, then go to the Macros tab, select a macro number, and click Add action in the bottom-right corner.
In this example we’ll create macro M1 using Add action.

- Add the action that opens the in-game chat.
Choose Tap, click +, and assign the Y key.
- Add a delay between opening the chat and typing the message (otherwise the text may not type correctly).
Click Add action again, choose Delay (ms), and set the delay to 100 ms.
Actions are executed from top to bottom. Keep this in mind when building macros. If you need to reorder actions, use the up/down arrow buttons on the left side of the action you want to move.
- Add the action that types the message text.
Click Add action, choose Text, and enter Hello! in the text field on the right.
- Add a delay between typing the message and sending it.
Click Add action, choose Delay (ms), and set the delay to 100 ms.
This delay is optional in this example, but for some other tasks it’s better to use it to ensure correct macro timing.
- Add the action that sends the message, then save the macro.
Click Add action, choose Tap, click +, and assign Enter.
When you finish creating the macro, click Save in the bottom-right corner.
Macros are saved to the keyboard’s internal memory and will also work on another PC. When saving a macro, Vial may ask you to unlock the keyboard by holding two keys in the top-left corner.
- Assign the created macro key to the layout.
In this example, assign macro M1 to a key on Layer 3: go to the Keymap tab in the top menu, select Layer 3, select the desired key on the layout, then in the bottom Macros tab click M1.
Choose any layer and key position that’s convenient for triggering the macro; see the layer section above for how to create layers.
More information about Macros can be found in the official QMK documentation.
RGB lighting setup in Vial
In Vial, you can customize key lighting in the “Lighting” tab by changing the effect, color, brightness, and animation speed.
RGB setup
- RGB Effect - choose different animations or a static color
- RGB Color - set the backlight color
- RGB Brightness - adjust backlight brightness
- RGB Speed - adjust animation speed
After configuring all RGB lighting parameters, click Save in the bottom-right corner of Vial to save all changes.
For more details about Vial features, see the article.
Switch replacement / hot-swap encoder installation
Removing a switch
- Remove the keycap: use a switch puller or a dedicated keycap puller.
- Remove the old switch: use a switch puller, grip the latches at the top and bottom of the switch, and gently pull upward until it comes out of the socket.
Installing a new switch
- Install the new switch: make sure the contacts (pins) are straight and aligned with the holes on the PCB. Gently press it in until it clicks.
- Put the keycap back on.
Installing a hot-swap encoder
- Install the hot-swap encoder: make sure the encoder pins are aligned with the contact pads on the PCB (the encoder’s contacts should be on the bottom). Gently press it in until it clicks.
Removing a hot-swap encoder
- Remove the encoder knob: pull the knob upward.
- Remove the encoder: use a switch puller, grip the latches at the top and bottom of the encoder, and gently pull upward until it comes out of the socket.
Reflashing / firmware update
Preparation:
- Download the latest firmware version here
- Save your layout in Vial: open the “File” menu, then click “Save current layout”.
Installation
To reflash/update the keypad firmware, you need to put it into bootloader mode. You can do this in several ways (choose one):
Bootmagic:
- Hold the top-left key on the second row (Esc in the default layout) and connect the USB power cable.
- Wait until the controller enters bootloader mode and a mass-storage drive opens.
Using the RESET button:
- Connect the USB power cable and quickly press the RESET button twice on the bottom of the keypad.
- Wait until the controller enters bootloader mode and a mass-storage drive opens.
Using the BOOT button:
- Hold the BOOT button on the bottom of the keypad and connect the USB power cable.
- Wait until the controller enters bootloader mode and a mass-storage drive opens.
- Copy or drag-and-drop the UF2 file; the controller should reboot immediately and start working in normal mode.
- Import your layout into Vial: open the “File” menu, then click “Load saved layout”.