High Plains Drifter v2
Connection
- The High Plains Drifter keyboard works with devices running Windows, macOS, Linux, Android, and iOS.
- The keyboard connects via Plug and Play (PnP); no additional driver installation is required.
- Before connecting to a computer, make sure the USB‑C cable that connects the two halves is firmly plugged into the connectors on both halves.
- When connecting to a computer, make sure the USB‑C cable is firmly inserted into the port.
Keyboard setup
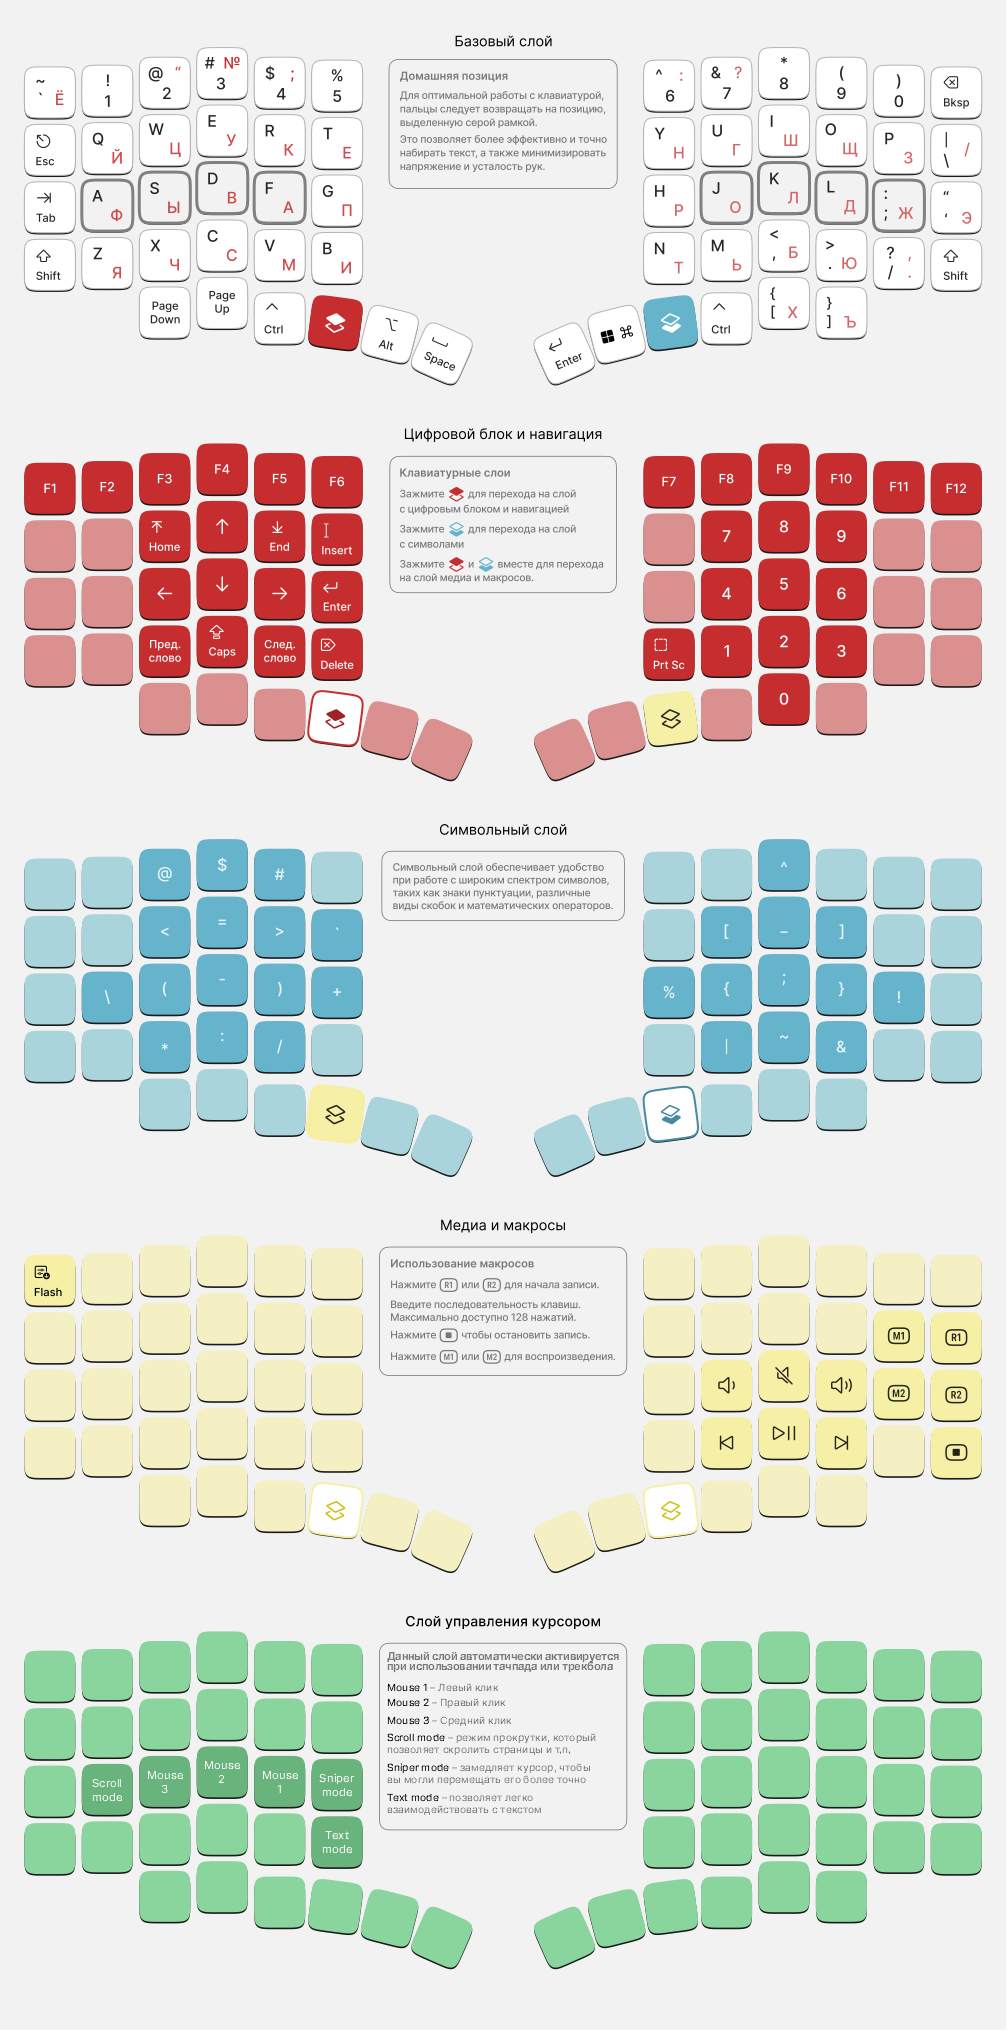
Please refer to the Vial software article
DPI and Auto mouse setup in Vial (for Trackball and Touchpad modules)
On the trackball and touchpad modules, you can adjust cursor movement sensitivity (DPI) and automatic activation of the mouse layer (Auto mouse).
Changing DPI in Vial
- Open Vial.
- In the top menu, go to the Layouts tab.
- Select the desired DPI value from the dropdown next to DPI.
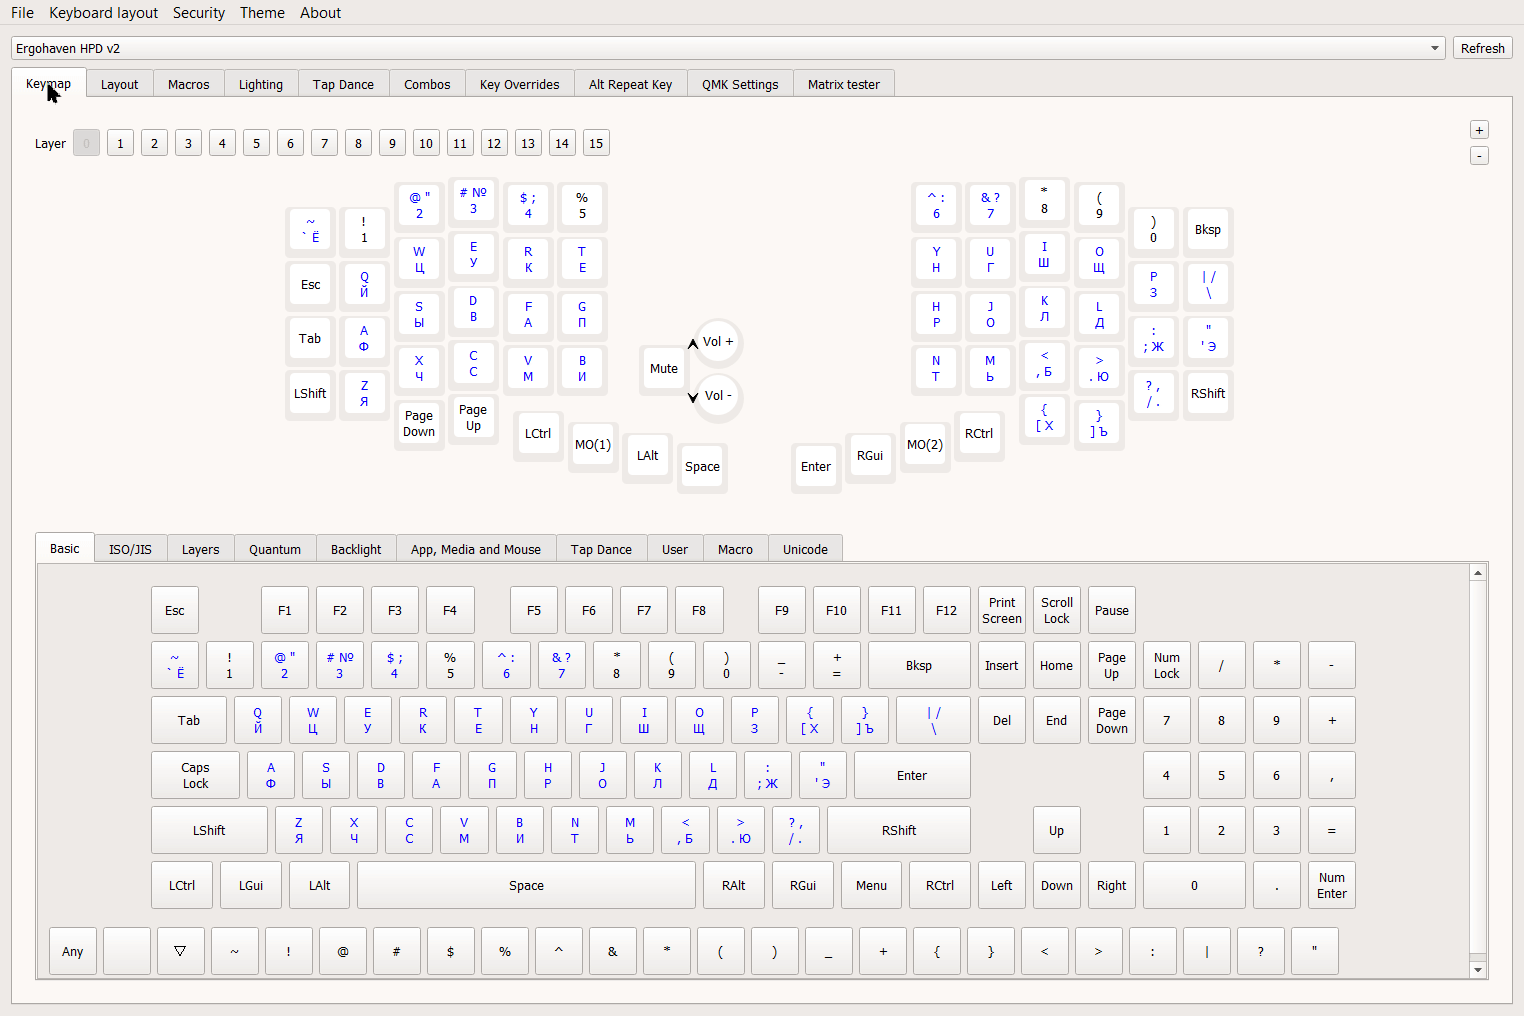
In this tab you can also configure:
- Acceleration - enable/disable cursor acceleration
- Invert scroll - enable/disable inverted scrolling
- Sniper sens - adjust cursor sensitivity for Sniper Mode
- Scroll sens - adjust cursor sensitivity for Scroll Mode
- Text sens - adjust cursor sensitivity for Text Mode
Configuring Auto mouse in Vial
- Download and open the Ergohaven fork of Vial.
- In the top menu, go to the QMK Settings tab.
- Then select the Auto mouse tab.
- Enable automatic mouse layer activation by checking Enable auto mouse layer feature.
- Click Save in the bottom-right corner to save the changes.
In this tab you can also configure:
- Index of layer to use as default target layer - choose the layer that will be activated when Auto mouse is enabled (by default, this is layer 4 in Ergohaven’s stock firmware).
- Time layer remains active after activation - set how long (in milliseconds) the mouse layer stays active after activation; the higher this value, the longer the mouse layer remains active.
- Time delay from last activation to next update - set the polling interval (in milliseconds) for mouse-layer activation.
Firmware update
Preparation
- Download the latest firmware version here.
- Save your layout in Vial: open the “File” menu, then click “Save current layout”.
Installation
Left half:
- Hold the top-left key and connect the USB power cable to the left half.
- Wait until the controller enters bootloader mode and a mass-storage drive opens.
- Copy or drag-and-drop the UF2 file; the controller should reboot immediately and start working in normal mode.
- Import your layout into Vial: open the “File” menu, then click “Load saved layout”.
Right half:
- Hold the top-right key on the right half (HPD v2) or the top-left key (HPD v1) and connect the USB power cable to the right half.
- Repeat the remaining steps as for the left half.
Modules (for HPD v2)
HPD v2 can expand its functionality by installing modules.
Left half:
- Encoder with indicator lighting (shows the active layer when it is enabled; a programmable encoder for volume control, navigation, and other useful functions)
Right half:
- Encoder with indicator lighting (same functionality as the left-half module)
- 38 mm trackball (for cursor control)
- 43×40 mm touchpad (for cursor control; supports tap = left mouse button, two-finger tap = right button, tap + hold = selecting text/objects, two-finger hold = scrolling)
- Joystick (mouse emulation, or you can assign up to 5 keys per layer)
Installing and configuring modules
- Before removing/installing a module, it is recommended to disconnect the master half from the device (PC, laptop, tablet, etc.).
- Remove the replaceable module or the side port cover (if present). Pull the module out in the direction opposite to its orientation (for the left half: to the right; for the right half: to the left). Do not bend the module up/down relative to the keyboard plane, as this can damage the connectors on both the module and the keyboard.
- Installation is done the same way as removal: place the required half and its module on the same plane (for example, on a flat surface). Mate the connectors, avoiding any skew and excessive force. Insert the module fully; a small gap between some case bends of the keyboard and the module is acceptable.
- Flash both halves with the corresponding firmware versions, following the same process as in the firmware update instructions.
HPD v2 modules require reflashing after replacing one module with another (for example, if a touchpad was installed and you replace it with a trackball, the trackball will not work without reflashing).
HPD v2 firmware files and descriptions
- no modules - firmware for a configuration with no modules
- encoder/trackball - firmware for the left-half encoder module with indicator lighting, or the right-half trackball module, or using both modules together
- encoder/touch - firmware for the left-half encoder module with indicator lighting, or the right-half touchpad module, or using both modules together
- encoder/joystick - firmware for the left-half encoder module with indicator lighting, or the right-half joystick module, or using both modules together
- encoder/encoder - firmware for the left-half encoder module with indicator lighting, or the right-half encoder module with indicator lighting, or using both modules together